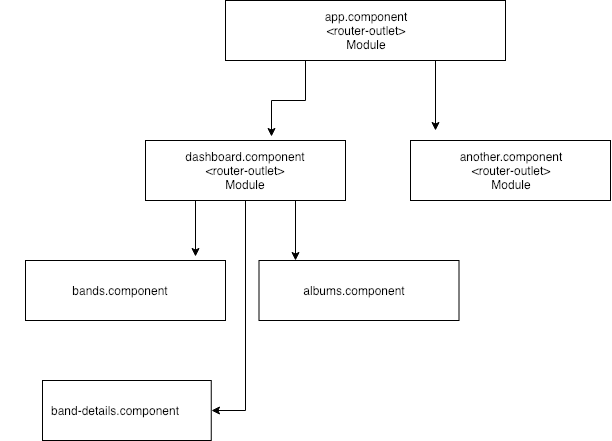
Sometimes it's hard to know how to create a scalable Angular application, especially when dealing with all Angular-Cli commands. It is very common not to know for sure when to use a module, or a component, or when a component is a page/view or even when we need a new routing file.
In this post we will see how to use the Angular-Cli to create an Angular application using the following diagram.

A few days ago, the Angular Console was launched, a graphic interface that abstracts the main commands and combinations of the Angular-Cli. However what this interface does, is just to show you a more intuitive way to build your application using the Angular-Cli commands behind the scene.
I personally recommend you to be familiar with the basic commands in your terminal. Of course this will help you a lot when using the Angular Console.
It is very common to find Angular applications containing only one module file, usually the app.module.ts and only one route file, the app-routing.module.ts. In small applications, this recipe may even work, but usually in the real world, this becomes a nightmare. Believe me I've seen app.module.ts files with more than 1000 lines of code.
When you organize your application in modules and routes for each functionality, you can keep everything much more organized. So let's see an example below very useful for this purpose.
Creating new application.
- Create the application using some useful flags.
ng new AppExample --style=scss --routing --skip-install -g -p appex
Flags explained:
| Flag | Action |
|---|---|
--style=scss |
Using SCSS instead default CSS option |
--routing |
Add application routing file |
--skip-install |
Skip dependencies installation (IE. node_modules) |
-g |
Skip git initialization |
-p appex |
Add appex as html prefix |
- Create a root module.
Type the following command, to go inside the newly created project: cd AppExample && src/app, still on terminal window type the following command:
ng g module dashboard --routing --spec=false
Flags explained:
| Flag | Action |
|---|---|
--routing |
Create a Routing file and add to DashboardModule. |
- Create a root component.
Type the following command:
ng g component dashboard/dashboard --flat -t -s --spec=false --module=dashboard
Flags explained:
| Flag | Action |
|---|---|
--flat |
Don't create a directory called dashboard |
-t |
Use Inline Template |
-s |
Use Inline Style |
--spec=false |
Don't generate a .spec test file |
--module=dashboard |
Add dashboard component to DashboardModule |
- Create a band page/component.
Type the following command:
ng g component dashboard/bands -t -s --module=dashboard
Adding routes
- Open
src/app/app.module.tsand import the DashboardModule right after AppRoutingModule. - Open
src/app/app-routing .module.tsadd the following route:
{
	path: '',
	redirectTo: 'dashboard',
	pathMatch: 'full'
}
- Open
src/app/dashboard/dashboard-routing.module.tsand add the following code:
{
	path: 'dashboard',
		children: [
		{
			path: '',
			component: DashboardComponent
		},
		{
			path: 'bands',
			component: BandsComponent
		}
	]
}
Refactoring the main app.component
- Open
src/app/app.component.tsand replace the content for the following code:
	<a  routerLink="/dashboard/bands">Bands</a>
	<router-outlet></router-outlet>
Creating services
- Inside your terminal window, type the following command:
ng g service dashboard/bands/_services/band
- Open
src/app/dashboard/bands/_services/band.service.tsand add the following code:
import { Injectable } from '@angular/core';
import { HttpClient, HttpErrorResponse } from '@angular/common/http';

import { environment } from 'src/environments/environment';
import { Band } from './../_models/band';
import { Observable, throwError } from 'rxjs';
import { catchError } from 'rxjs/operators';

const API_URL = environment.apiUrl;

@Injectable({
  providedIn: 'root'
})
export class BandService {

  constructor(
    private http: HttpClient
  ) { }

  getBandList (): Observable<Band[]> {
    return this.http.get<Band[]>(`${API_URL}/bands`)
      .pipe(
        catchError(error => this.handleError(error))
      );
  }

  private handleError(error: HttpErrorResponse) {
    if (error.error instanceof ErrorEvent) {
      console.error('An error occurred:', error.error.message);
    } else {
      return throwError(error);
    }
    return throwError('Ohps something wrong happen here; please try again later.');
  }
}
Note that we are using the environment files to setup the Api url
Now let's create a Model for band service.
Creating Models
Here we have two options to create a Model, using Class or using Interface, as we know interfaces doesn't exit on JavaScript, so the purpose here is only to use the TypeScript type checking, so for this example we are using the Class implementation.
- On your terminal type the following command:
ng g class dashboard/bands/_models/band --spec=false
- Open
src/app/dashboard/bands/_models/band.tsand add the following code:
export class Band {
  name: string;
  country: string;
  genre: string;

  constructor(values: Object = {}) {
    Object.assign(this, values);
  }
}
Now besides having the TypeScript type checking we can instantiate a new class using the new keyword: new Band().
Refactoring the band.component.ts and band.component.html
- Open
src/app/dashboard/bands/band.component.tsand add the following code:
import { Component, OnInit } from '@angular/core';

import { Band } from './_models/band';
import { BandService } from './_services/band.service';

@Component({
  selector: 'appex-bands',
  templateUrl: './bands.component.html',
  styles: []
})
export class BandsComponent implements OnInit {
  bandList: Band[];

  constructor(
    private bandService: BandService
  ) { }

  getBands() {
    this.bandService.getBandList().subscribe(
      response => {
        this.bandList = response;
      },
      error => {
        console.log(error);
      }
    )
  }

  ngOnInit() {
    this.getBands();
  }

}
- Open
src/app/dashboard/bands/band.component.htmland add the following code:
<p>
  bands works!
</p>
<ul *ngFor="let band of bandList; let i=index">
  <li>{{ band.name }}</li>
</ul>
Creating a sample Api
For this section we will use the json-server module.
- Open yout terminal window and type the following command:
npm install json-sever --save-dev
- Open
package.jsonfile and add the following script:
"json-server": "json-server --watch db.json"
- Create a new file called db.json at the root project with the following content:
{
  "bands": [
    {
      "id": 1,
      "name": "Motorhead",
      "country": "England",
      "genre": "Heavy Metal"
    },
    {
      "id": 2,
      "name": "Slayer",
      "country": "USA",
      "genre": "Thrash Metal"
    },
    {
      "id": 3,
      "name": "Truckfighters",
      "country": "Sweeden",
      "genre": "Stoner"
    }
  ]
}
That's all, pretty easy!
Running the app
- Open your terminal window and type the following command:
npm start
- On another terminal window, type the following command:
npm run json-server
Well, just check the http://localhost:4200 and navigate!